
I am currently playtesting my space ship wargame Rail Gun. I used miniatures with the
game for the first time today, having used counters in the past In the game, a battleship escorted by two
destroyers engaged a pair of enemy heavy cruisers and three destroyers. The fight was quite bloody---one heavy
cruiser destroyed, the second badly damaged; the battleship was barely space-worthy. I am still working on game balance but I
counted this as a successful playtest.
Pics and a blow-by-blow account of the game below.

SET UP
This was a simple engagement. The two sides are just trying to destroy
the other.
 |
| The "table": a 28"x22" foam core board, with fleets at opposite corners. I played the game in centimeters to accomodate the small space. |
The heavy cruisers have strong weaponry but no
ship-killers. Some of their systems are
armored.
The fleet- and escort-destroyers are comparable, though the
fleet-destroyers are faster and have better firing arcs. The raider-destroyer is lightly armed except
for its missile armament: deadly ship-killer missiles, representing missiles
with high-yield warheads.
 |
| Side A: Two heavy cruisers, two fleet-destroyers, and one raider-destroyer. |
 |
| Side B: A battleship and two escort-destroyers. |
 |
| The quick reference sheet. Rolls are done with D6s or pairs of D6s. |
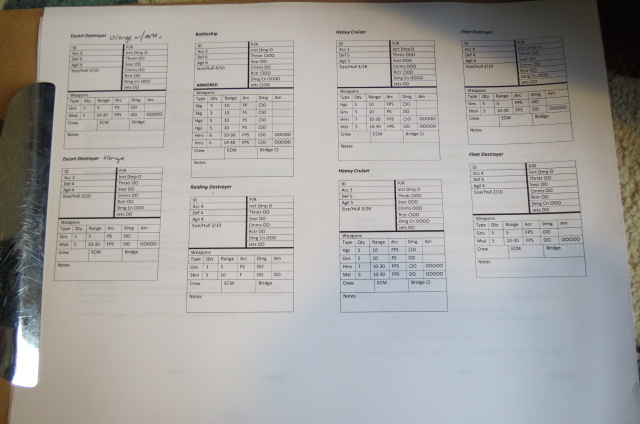 |
| The ship charts. Each ship has a single "data card", which can fit onto a 3x5 card. I printed them smaller so I could have everything on one sheet of paper. |
Turn 1
No combat—both sides approach each other at cruising speed
Turn 2:
Side B’s fleet- and raider-destroyers accelerate to take up
flanking positions. Side A’s battleship
and destroyers continued forward.
 |
| Dice indicate speed. The triangular marker indicates the use of "hard acceleration." |
Turn 3:
Continuing to move into engagement range, the forces are now
in firing range with their missiles.
Ships declare what weapons are firing at a target. The target then takes a series of saving
throws against the attack: electronic counter measures (ECMs) and defense
systems (gatling guns, lasers, etc.) against missiles, and ECMs and agility
against guns.
SIDE B’s fire: The battleship opened fire on one of the
heavy cruisers. With a salvo of 12
missiles, the BB hit the cruiser and dealt it three hull damage, damaged the
defense systems, and inflicted casualties on the crew.
One escort destroyer fired on the fleet destroyers. With 5 missiles, it inflicted 1 hull hit and
damaged a thruster system.
SIDE A’s fire: The
heavy cruisers fired missiles on the battleship. With 14 heavy missiles and 10 missiles, the
cruisers’ fire was desultory, knocking out two of the battleship’s 6 defenses
and damaging the ship’s sensors.


TURN 4:
The battleship repaired its damaged sensors during the
damage control phase.
One heavy cruiser broke right, hoping to avoid the worst of
the BB’s fire, but remained square in its sights. The raider-destroyer burned hard to stay in
the fight, as did one of the escort destroyers.
(Despite knowing that I need to keep my speed down so the ships can
actually handle responsively, I ended up going too fast with several ships!)
SIDE B’s fire: The battleship opened fire with everything it
had. Under the battleship’s formidable
fire (10 heavy guns, 3 ship-killers, and 12 heavy missiles) one heavy cruiser
suffered 8 hull hits. Critical damage
started three fires and inflicted a power failure. Ouch!
SIDE A’s fire: One
heavy cruiser launched a full spread of ECMs, which protected it from the
battleship’s remaining three ship killers but prevented it from firing this
turn.
The other heavy cruiser, plus the two fleet destroyers, laid
down 5 guns, 5 heavy guns, 20 missiles, and 7 heavy missiles against the
battleship. This inflicted 5 hull hits
(the battleship’s armor protected it from the worst of the hull damage), but
started a fire and hit two weapon batteries and the reactor. Fortunately, the three systems were Armored,
and thus the first critical hit had no effect on the system’s functionality.


TURN 5:
The battleship put out its fire, but at the cost of a damage
control team (a bad roll meant they died fighting a zero-gravity fire). The damaged heavy cruiser put out 2 fires and
fixed the power failure, meaning its sensors and communications were online
this turn—the 3rd fire inflicted another hull damage.
The ships moved slowly, with every ship in Side A’s fleet
except for the raider firing on the battleship.
SIDE B’s fire: The
battleship hit the raider with a broadside, but the raider launched a full
spread of ECMs (ships can do that once
per game) and the better ECM protection limited the damage to 3 hull points
and a hit on the raider’s small gun battery.
The BB also damaged one of the fleet destroyers with a barrage of
missiles. Its real target, however, was
a heavy cruiser, which it attacked with all 6 of its ship killer guns. The attack obliterated the heavy cruiser.
The escort destroyers had no successes in their fire.
SIDE A’s fire: The
entire Side A force returned fire on the battleship. The heavy cruisers and fleet destroyers
attacked the battleship with 14 heavy missiles, 20 missiles, 15 guns, and 5
heavy guns. Together, that barrage took
out 10 hull points. Critical hits
damaged the battleship’s communications, knocked out another defense system,
destroyed one full ship killer gun (leaving it to 3 attacks, rather than 6),
and inflicted heavy casualties on the crew.
But the real attack came from the raider-destroyer, who
loosed a pair of deadly ship-killer missiles.
The battleship’s defense system failed to shoot down the missiles and
the devastating took out 13 hull points, wrecking the battleship. The BB was still in the fight but seriously
hurting. The critical hits knocked out
the BB’s reactor and maneuvering jets.

 |
| No more heavy cruiser. The game's campaign system will have rules to determine what happens to the crew of a destroyed ship. |
TURN 6:
The battleship was able to get the reactor back online, but
with only enough power to allow minor acceleration and reduced gunnery. The damage control crews focused on the
reactor so had nothing left to get the maneuvering jets operational, so the BB
couldn’t change its facing.
SIDE A’s fire: In the final turn, the raider hit the
battleship with another ship killer missile, but this one only inflicted 4 hull
points. A critical hit did destroy the
BB’s inertial dampener, preventing it from using hard acceleration for the rest
of the game.
SIDE B’s fire: The BB
wrecked the raider, leaving it combat ineffective (of course, it was out of
ammo already for its ship killers—leaving it mostly useless). One escort destroyer had actually maneuvered
behind the remaining heavy cruiser, and inflicted a very respectable hit with
its 5-missile spread: 3 hull damage, and criticals including a fire and
thruster damage.
Other ships’ fire was ineffective.


I called the game at this point. Both sides were badly shot up. The BB couldn’t take another ship killer hit
or full attack from Side A’s combined forces.
However, the raider destroyer was out of ship killers and had suffered
crippling crew casualties, the fleet destroyers lacked the raw firepower to
decide anything on their own, and the surviving heavy cruiser was shot up (all
of its weapon systems damaged or destroyed) and was badly out of position.
 |
| The sorry state of the ships at the end of the game, and my scrawled notes at the bottom. |
PLAYTESTING OUTCOMES—good and bad
GOOD:
The game played well and pretty quickly—about 75 minutes for
this engagement. 8 ships duked it out on
a small game space (the game space was a foam-core board measuring 28” by 22”, and I played in centimeters),
with ample room to maneuver. This means that players can run a small or medium sized game on a dining room table or even a card table.
Damage felt right. I
want players to feel a bit like they’re on a ship in a TV show, with red
emergency lights, alarms blaring, and that one character who repeats everything
the computer says telling you, “Weapons are down!” Ships got plenty of critical hits once they
were in close combat. Damage control
also felt suitably desperate, but not so hard that a player can’t achieve
anything.
BAD:
Ship killers were too powerful. I will adjust the damage table to tone them
down a bit. I also want ship killer guns
to damage differently than ship killer missiles. This can be done easily enough, also by
adjusting the damage table.
I want a little bit more maneuver in the game. I need to percolate on how to do that. Perhaps by making head-on attacks less
effective but tailing attacks more effective—this will encourage players to
maneuver for those kind of attacks. I
might also eliminate the restriction on using Hard Acceleration only every
other turn.
Thanks for looking and taking the time to read.
If you are interested in buying the playtest version, it is
available at the Wargame Vault. You’ll get all the
updates and the final version of the game when it’s done.
No comments:
Post a Comment